How To Install and Remove Taper-Lock Bushing
Install Taper Lock Bushing
1) Thoroughly clean the shaft, bushing bore, exterior of the bushing, and sprocket/sheave hub bore to remove any traces of oil, paint, or dirt. Additionally, carefully file away any burrs for smooth and precise assembly.
Note: Avoid using lubricants during the installation of tapered bushings to prevent hub fracture.
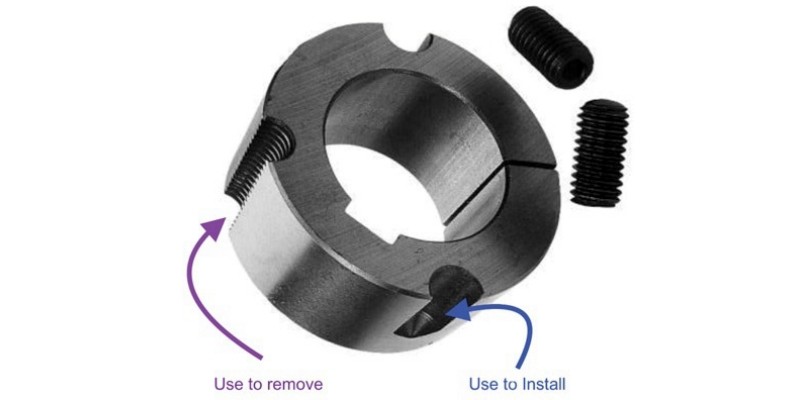
2) Insert the bushing into the sprocket/sheave hub and align the holes. All holes should be half-threaded, with installation holes threaded on the sprocket side and removal holes threaded on the bushing side. See Figure 1 below.

3) Apply a light coating of oil to the bolts and thread them into the half-threaded installation holes, as indicated by the white installation holes in Figure 1.
4) Position the sprocket/sheave and bushing assembly onto the shaft, ensuring the key rests in the shaft keyway. Allow for slight axial movement of the sprocket/sheave, which may occur during the tightening process.
Note: Avoid lubricating the bushing taper, hub taper, bushing bore, or shaft to prevent the risk of sprocket/sheave hub fracture. DO NOT USE LUBRICANTS.
5) Alternatively, apply torque to the bushing bolts until the sprocket/sheave and bushing tapers are fully seated together. Use approximately half of the recommended bolt torque (refer to Table 1).
Note: Avoid using worn hex key wrenches, as this may lead to a loose assembly or damage to the bolts.
6) Inspect the alignment and axial runout (wobble) of the sprocket/sheave, and make adjustments as required for proper alignment.
7) Continue alternating the tightening of the bolts until reaching the recommended torque values specified in Table 1 below.
Table 1 – Taper–Lock Bushing Bolt Torque Values
Caution: Excessive bolt torque can cause sprocket/sheave and/or bushing breakage.
Note: To ensure proper drive performance, full bushing contact on the shaft is recommended.
8) To enhance the bushing's gripping force, firmly tap the face of the bushing using a brass drift or punch. Avoid hitting the bushing directly with the hammer.
9) Re-torque the bushing bolts after completing Step 8. Once the recommended bolt torque value is reached, do not continue tightening. Over-tightening may lead to over-insertion of the bushing.
10) After the initial drive run-in, recheck all bolt torque values and periodically thereafter. If any bolts are found to be loose, repeat steps 5 through 9.
Remove Taper Lock Bushing
1) Begin by loosening and removing all mounting bolts.
2) Insert bolts into all jack screw holes, as indicated by the dark removal holes in Figure 1 on page 1.
3) Loosen the bushing by alternately tightening the bolts in small, equal increments until the tapered sprocket/sheave and bushing surfaces disengage.
CTS® | Taper Lock Bushing Supplier
Professional Transmission Parts Supplier
CTS® is an industry-leading Transmission Parts supplier with excellent customer service. We take our products and customers seriously, combining high-quality products and professional services to provide our customers with the Transmission Parts that best suit their applications. With CTS®'s taper bushing and weld-on hub online selection, we can easily find you online or via phone consultation. We supply transmission parts all over the world!
If you have any questions about roller chains, please contact us to help you.